

How To Use Imovie App
If your iPhone is total of videos of your summer vacation, clips of your kids, recordings of your grandparents that you lot desire to preserve, a birthday, or some other festivity, then you might exist glad to know that you lot can speedily edit your video recordings and create really professional looking home movies on your iPhone or iPad.
Apple tree's iMovie app began life every bit a Mac application back in 1999 and has been on the iPhone since 2010. The iMovie app is designed to be simple to use, so anyone can create something beautiful, and even those who aren't all that technical can create something in only a few steps.
If yous've even so to sample its delights and aqueduct your inner Hitchcock, there'southward no better time than the present. In this article nosotros testify how to accept your starting time steps with iMovie on iPhone.
Should you desire to utilise the app on your iMac or MacBook, take a look at our How to use iMovie for Mac guide.
How to get iMovie
iMovie isn't installed on your iPhone or iPad by default, but you lot tin can option up the iMovie app for free on the Apple tree App Store. There is a version for the iPad and iPhone, and the file size is listed as merely over 700MB, so be sure you accept enough space on your device and are connected to a Wi-Fi connection when downloading (unless you have a large data plan, in which instance you can use 4G).
Using iMovie
When yous outset open up iMovie yous'll run into the Welcome to iMovie folio, explaining that you can select clips, add titles, drop in music and apply effects to make movies. Nosotros'll walk through how to do all of those below.
The page as well highlights that yous can Create Trailers – these are templated, so it's really easy to pick a few clips and let Apple'due south app do the difficult work for you, creating an agreeable trailer-style homage to an effect or holiday.
And because the iMovie app is bachelor for iPhone, iPad and Mac you tin can continue to edit your clips on any of those devices.
Once you go along past the first screen you'll come across your Projects screen. Here you lot'll see any existing projects, and the option to Create Project which is the start step to making your BAFTA winning movie…

Stride one: Create an iMovie Projection
Tap the Create Project push button in the main panel.
You lot'll be presented with ii styles of projection:Movie or Trailer. The former is essentially a blank canvas, while Trailer uses pre-built templates into which you can insert stills and video.
To get to grips with iMovie we recommend starting with Movie. Tap that section of the screen.

Step 2: Choose the clips y'all want in your iMovie
The adjacent screen taps into all the video and photos that are stores on your iPhone organised past 'Moments', which should mean that events are sorted into categories which could go far easy to find all your vacation videos speedily.
Just tap on the clips and photos you lot desire to use for your moving-picture show. Every bit you exercise so you lot'll observe that at the bottom of the screen below where it says Create Movie, information technology will indicate how many clips you have selected and how long that movie would be (assuming yous didn't edit those clips down).
Tap the clips or photos you lot desire to utilise (you can always add together others subsequently on) and so tap Create Picture.
iMovie will automatically conform your clips into a sequential lodge on a timeline (the strip at the bottom of the screen). It volition add transitions between each prune that makes them alloy together smoothly.
To get a feel for how your iMovie is meeting you tin 'scrub' through the clips by swiping your finger on the timeline. Or, you could swipe to the showtime of the movie and play information technology by borer on the Play icon (the traditional block pointer).
You could leave it at that and for some that would be quite plenty movie editing, just it is oft the case that your clips will be a tad long (brusque clips will always be better than long ones) and inevitably yous volition have pointed the phone to your feet before you lot finish the recording, which could spoil your masterpiece.
Before you start editing, you lot may want add together more clips. In which case, tap the + icon on the left side of the main panel. This will take you to a page of shortcuts to your photos and videos. You tin either go back to the Memories view seen above, or go directly to Video, Photos, or Albums (we often make an album of the photos and video we want to utilise in a film to go far easy to select everything from i place – handy if it's a review of the yr, for case). Select the additional prune you lot want to use and click on + to add it.
You might likewise desire to change the lodge of your clips, in which case but tap and concord one of the clips and drag it to the preferred position. Permit become and the clip volition drib into place.
Now that y'all have all the clips, and you are happy with the order, you can begin editing.
Step 3: Edit your clips in iMovie
To start editing in iMovie tap on a prune in the timeline. Yous will know you accept entered editing mode because the clip will be outlined in yellow.
iMovie offers various ways to edit your clips:
- Edit the length of a clip, change the beginning or finish signal
- Turn one long clip into multiple brusque clips
- Duplicate a clip
- Ho-hum down or speed up a clip
- Increment or subtract the audio on a clip
- Modify the transitions between clips
- Add background music to your clips
We'll look at the to a higher place options in more detail below, starting with editing the length of a clip.
How to shorten a prune in iMovie
If you have a clip that is bully, merely you aren't happy with the beginning or terminate, it's easy to change the signal at which information technology starts or ends.
- To shorten the prune (change the beginning and terminate points) beginning tap on the clip so that it is outlined in yellow.
- Press and concord the thick yellow bar at the commencement of the prune and elevate it to the indicate y'all'd similar the clip to starting time.
- To change the point where the clip ends, swipe to the cease of the clip, tap is over again so it is outlined in yellowish and elevate back to where you desire to finish the clip.
How carve up a clip into multiple clips
You lot may have a really long clip that you'd like to change into multiple clips, which will allow yous to add transitions and edit out $.25 you aren't happy with.
- Observe a point in the clip that y'all wish to 'split' it (marked with a white line).
- Tap on Split.

- Your clip will instantly separate with a box representing the 'transition' y'all'll be able to add together between the resulting clips (no transition is added past default, we'll talk virtually adding transitions later).
- You lot can at present alter the beginning and terminate points of the 'new' prune, or Split it into further clips.
How to duplicate a clip
You could, for example, take the same clip appear more than than once, or you might want to play it forwards and then backwards. Nosotros'll talk later on on virtually how to brand iMovie play a clip backwards. For now, it'south really easy to duplicate a clip:
- Just tap on the clip and choose Duplicate.
How to undo something in iMovie
Nosotros'll quickly mention this here, before nosotros move onto the more than fiddly $.25.
If y'all've divide something by accident, or in the wrong place, so tap the Undo icon (an arrow bending back on itself) establish to the right of the primary pane.

How to edit the sound of a clip
We'll mention this here because it's an option you might accept seen while yous were editing the length of your clip: Detach.
If you tap on Detach, iMovie will carve up the audio from the video prune. This will allow y'all to edit the audio split up to the rest of the video. For example, you might want to overlay some narration or music, in which case you'll be able to reduce the racket of the original recording to end it clashing.
Information technology likewise means you can edit the audio by dragging the edges to make it shorter, tapping the Separate option to cut pieces out, or even apply the Background setting, which reduces the volume so that y'all tin can overlay new sound while retaining the ambience of the recording.
How to adding slow or fast motility
While you've been editing the length of yourclips you might accept noticed the other options forth the bottom of the screen. The scissor icon is for editing, simply abreast that you lot'll find an icon that looks similar a car's speedometer, a speaker, a text and a colour icon.

- Click on that speedometer icon to add slow-motion or sped-up sections of the video.
- Y'all'll see an area beneath the clip highlighted in yellow – drag the beginning and end points of where you desire the video to speed upwards or slow down.
- With the area of the clip yous want to affect highlighted, slide the command closer to either the tortoise (dull) or hare (fast).
Again, if things go a bit messy (and this control is somewhat fiddly) tap the Reset option to put things back as they were.
Step iv: Edit the iMovie transitions
Past default iMovie will add a standard Dissolve transition between your clips (unless these are new clips you've created by splitting a clip). All the same there are lots of transitions yous can use, including:
- None
- Theme
- Dissolve
- Side
- Wipe
- Fade
How to modify a transition
- To change the mode of transition from the default, tap on the icon that you'll encounter between clips.
- This opens a menu with the various types available. Tap the replacement and information technology volition be automatically inserted.

- Should you wish to change the length of time the transition takes, which could exist useful for those slow, moody dissolves, tap the fourth dimension settings to the left of the transition styles, which offer ranges from 0.5 up to two seconds (depending on the length of the clips either side).
Stride 5: Add filters to your iMovie
Just like you'd detect on Instagram, Snapchat or the Photos app, there are diverse filters that allow you to apply a visual mode to private clips, or your whole video. There are various options including:
- Black and white (B&W)
- Blast
- Blockbuster
- Blue
- Camo
- Dreamy
- Silent Era
- Vintage
- Western
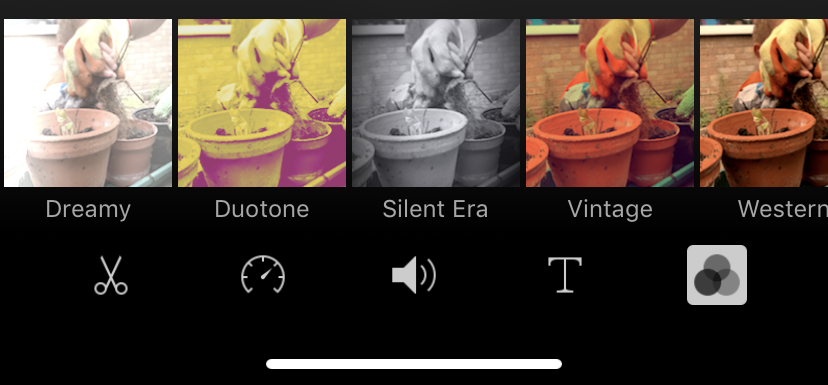
How to add filters
- To add a filter select a prune.
- Tap on the filters icon (three circles).
- Cull your filter.
- If yous want the whole movie to use the same filter you'll have to add it to each prune individually.

Step vi: Add music to your iMovie
With your movie now taking shape, yous might want to replace the standard sound with some music.Apple has a library of rights-costless music you can employ, or you could etch something youself in Garageband.
Nosotros don't advise that you use whatever popular music though every bit you'll probably observe that as soon as you try and share it via social media yous won't be able to.
How to add backing music
- To exercise this tap the + button and and so select the Sound option. Here you can choose from the Theme music that comes with iMovie, a range of Sound Effects, or whatsoever music you lot accept in your Apple Music app.
- Discover the one you want, select it, then tap Use.
- iMovie will drop the clip on to your timeline. Double-tap information technology to enter the editing mode, then resize and position information technology as you meet fit.
Footstep 7: Add titles to your iMovie
Finally to make your movie await professional you'll need some titles.
There are various Titles options including:
- Standard
- Prism
- Gravity
- Reveal
- Focus
- Pop-Upwards
If you tap on each you'll meet a preview of what to await.
How to add a title or text to your movie
- Tap on the T icon when editing a clip.
- You'll see a number of dissimilar styles appear, each with its own font and animation.
- Select the one that suits your project, blazon in some text, then select to accept it displayed either beyond the middle of the clip or in the lower corner.

Pace viii: Sharing your movie
When you're happy with your artistic efforts, tap the Done option. You'll now be able to lookout man the picture show, then tap the Share button (a square with an pointer pointing out of it) to send information technology to your friends. A Hollywood career awaits.
Want to try out some alternatives, hither are the best free or inexpensive Mac video editors. Nosotros also take this advice about How to brand a video slideshow on your iPhone using Photos

How To Use Imovie App,
Source: https://www.macworld.com/article/673179/how-to-use-imovie-on-iphone.html
Posted by: stewartneents.blogspot.com
0 Response to "How To Use Imovie App"
Post a Comment